Benedict Chan

software journey

Setting up Ubuntu and Docker

This post just listed some commands I used for setting up a testing Ubuntu machine and Docker.

Install xfce using apt

    sudo apt-get update
    sudo apt-get install xfce4

Install xrdp using apt

    sudo apt-get install xrdp
    sudo systemctl enable xrdp
    echo xfce4-session >~/.xsession
    sudo service xrdp restart

    # *Setting up a password for the rdp user*
    sudo passwd {username}

Setting up Docker

    sudo apt-get install \
        apt-transport-https \
        ca-certificates \
        curl \
        software-properties-common

    curl -fsSL https://download.docker.com/linux/ubuntu/gpg | sudo apt-key add -

    sudo add-apt-repository \
       "deb [arch=amd64] https://download.docker.com/linux/ubuntu \
       $(lsb_release -cs) \
       stable"

    sudo apt-get update

    sudo apt-get install docker-ce

Setting up Docker Compose

    sudo curl -L https://github.com/docker/compose/releases/download/1.23.1/docker-compose-`uname -s`-`uname -m` -o /usr/local/bin/docker-compose
    sudo chmod +x /usr/local/bin/docker-compose

Common methods for SSH under Windows

    # *Generating SSH key with a specific location*
    ssh-keygen -t rsa -b 2048 -C "{comment/email}" -f {KeyLocation}

    # *Copying the SSH public key*
    clip < {KeyLocation}.pub

    # *SSH using a key with a specific location*
    ssh username@hostip -i {KeyLocation}

Setup Firefox

    sudo apt-get install firefox
Use Docker to setup an environment for Octopress2

Docker image for running Octopress 2

Since this blog is made from Octopress 2 and it seems that Octopress has ended it’s development after version 3.

In order to keep using it, it’s better to create an development environment that I can keep on running it in the future.

The DockerFile for setting this environment is located here.

The Docker image is located in Docker Hub: https://hub.docker.com/r/benedictchan/octopress2/.

Running the environment

To simply use this Docker image, you can just mount your Octopress repository’s source branch to the container’s app folder:

docker run -ti --rm -p 4000:4000 -v {source_path}:/app benedictchan/octopress2

Read on →


A taste in Pandas, ipython notebook

After setting up the python enviornment in the previous post. I am going to run some python scripts to test our enviornment.

The exercise

The example is actually some exercises provided by the following link: A2. Linear Regression – Data Exploration – Lending Club, which is part of the page Learn Data Science.

The exercise includes: – Reading a sample csv data into pandas – Removing % signs from rates – Removing the word “months” from loan length. – Managing outliers, remove such rows in this case

I have implemented them as an ipython notebook and it can be previewed here.


Exporting data to CSV in SQL Server using bcp

There are several ways to export data in SQL Server, in this post, I am using bcp with xp_cmdshell.

We will first create a simple select statement to test whether we can export our data, then we will use a stored procedure to handle complex queries. Finally we will try to add variables to our script so that we can make this export script to be run in SQL Server Agent as a scheduled task.

Test the export with a simple select statement

exec master..xp_cmdshell 'bcp "select * from DataSeries" queryout "C:\Export\dataseries.csv" -c -t"," -r"\n" -T'

However, you will receive an error of: [SQL Server]Invalid object name ‘Table’.

So, in order to run this simple query, we actually need to tell SQL Server the full name of our table schema, which should be:

exec master..xp_cmdshell 'bcp "select * from [db_name].[dbo].[DataSeries]" queryout "C:\Export\dataseries.csv" -c -t"," -r"\n" -T'

Complex Query, use stored procedure

Read on →

Setup Python (Anaconda) Environment in Visual Studio

Installing Python (Anaconda)

In the old days, setting up an python environment with packages like NumPy SciPy in Windows may takes several hours. This may include building NumPy or SciPy yourself.

Now, to save our day, we can actually just install them easily by some special distributions like:

Here, I am going to install Anaconda, simply download the Windows installer and you are done.

Setup Visual Studio as your Python IDE

To use Visual Studio as your Python IDE, we can install the Python Tools for Visual Studio (PTVS).

Setup Python Environment – Anaconda

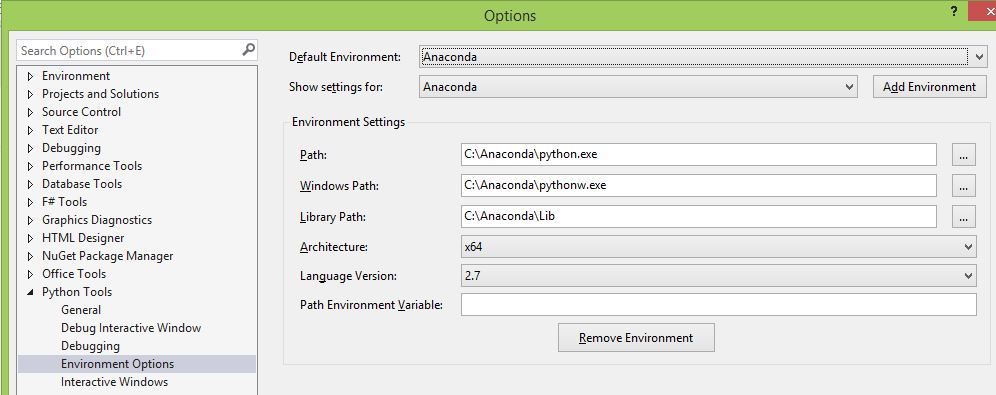
Now that we have installed (PTVS), we have to tell (PTVS) where to find our Python distributions, in this case, the one that Anaconda installed. We can configu it from:

From Visual Studio –> Options –> Python Tools –> Environment Options

We can setup our new Anaconda environment like this:

Once we have finished the setup, we can create a Python Project in Visual Studio, then try to run it our script using :

From Visual Studio –> Options –> Python Tools –> Execute Project in Python Interactive


Resolving implementations at runtime using Autofac

There are lots of ways on resolving your services and implementations at runtime in Autofac. Following is a simple example to demonstrate how we can do it.

Assumng we have a simple interface IDataService that will provide us some data.

IDataService.cs
public interface IDataService
{
string GetData();
}

We are consuming this service and will return our users the data based on their Role, there are two roles in this example. And we are providing different implementation for the IDataService for each role.

public enum RoleName
{
Premium,
Normal
}
public class PremiumDataService : IDataService
{
....
}
public class NormalDataService : IDataService
{
....
}

Simple Solution using Func<> as our factory in Autofac

We will use a simple function Func<RoleName, IDataService> as our dependency in our Controller. It will act as our factory so that we can consume this factory to get our expected data.

private readonly Func<RoleName, IDataService> _dataServiceFactory;
public HomeController(Func<RoleName, IDataService> dataServiceFactory)
{
this._dataServiceFactory = dataServiceFactory;
}
public ActionResult GetData()
{
....
var dataService = this._dataServiceFactory(roleType);
var data = dataService.GetData();
....
}
Read on →

Authentication logics from ASP.NET MVC 4 to 5

OWIN

To allow security sharing by other components that can be hosted on OWIN. ASP.NET MVC 5 has applied a new security feature based on the OWIN authentication middleware.

For more information, please click here.

To start, let’s create a new project based on Visual Studio 2013’s template: Individual User Accounts.

MVC5 Template: Individual User Accounts

Have a look in the web.config of this newly created project. We will find that FormsAuthenticationModule is removed.

web.config
<system.webServer>
<modules>
<remove name="FormsAuthenticationModule" />
</modules>
</system.webServer>

Now also have a look in what’s the new logic is added for supporting OWIN.

\app_start\startup.auth.cs
public void ConfigureAuth(IAppBuilder app)
{
// Enable the application to use a cookie to store information for the signed in user
app.UseCookieAuthentication(new CookieAuthenticationOptions
{
AuthenticationType = DefaultAuthenticationTypes.ApplicationCookie,
LoginPath = new PathString("/Account/Login")
});
// Use a cookie to temporarily store information about a user logging in with a third party login provider
app.UseExternalSignInCookie(DefaultAuthenticationTypes.ExternalCookie);

It looks like the template offers a Cookie authentication as default, does it work if we applies our ASP.NET MVC 4’s FormsAuthenticationTicket to it?

Read on →

Adding Email Templates service in your ASP.NET MVC projects using IoC

It looks obvious to give your web applications to send an email with some templates engine. After some googling, I decided to use Postal as the preferred service because: 1. It uses Razor engine for the template, which everyone is familar with 2. It is based on the .NET framework’s built in SmptClient ( so you can just config it using web.config ) 3. It is designed to be used in a dependency injection pattern (provide unit testing for your controllers or classes)

Using the IEmailService

With a decoupled design, it is possible you will seperate your logics include sending an email in your logic classes but not in your asp.net controller. Therefore, an IEmailService that supports dependency injection is a better way to use than having an Email service just be used in a controller. To apply Postal in your class, we can simply inject it’s IEmailService to our business logic class.

BusinessService.cs
public class BusinessService : IBusinessService
{
private readonly IEmailService _emailService;
public BusinessService(IEmailService emailService)
{
this._emailService = emailService;
}
}

And your controller

SomeController.cs
public class SomeController : Controller
{
private readonly IBusinessService _businessService;
public SomeController(IBusinessService businessService)
{
this._businessService = businessService;
}

Register the service using Autoface as our IoC

builder.RegisterType<EmailService>().As<IEmailService>();

Now you can create your email templates in your Views\Emails folder and send it inside your business logics class


Creating custom Filter Attribute in Orchard

Filter in Orchard

When working in Orchard, it’s always a good idea to look at the current codebase as an example.

The one I chose as a reference in creating my custom filter attribute is the Theme filter.

It is located in $\Orchard\Themes\ThemeFilter.cs inside the Orchard.Framework project.

You will notice that ThemeFilter is actually inherited from a class called FilterProvider.

ThemeFilter.cs
namespace Orchard.Themes {
public class ThemeFilter : FilterProvider, IActionFilter, IResultFilter {
public void OnActionExecuting(ActionExecutingContext filterContext) {

Now lets have a look inside FilterProvider.

ThemeFilter.cs
public abstract class FilterProvider : IFilterProvider {
void IFilterProvider.AddFilters(FilterInfo filterInfo) {
AddFilters(filterInfo);
}
protected virtual void AddFilters(FilterInfo filterInfo) {
if (this is IAuthorizationFilter)
filterInfo.AuthorizationFilters.Add(this as IAuthorizationFilter);
if (this is IActionFilter)
filterInfo.ActionFilters.Add(this as IActionFilter);
if (this is IResultFilter)
filterInfo.ResultFilters.Add(this as IResultFilter);
if (this is IExceptionFilter)
filterInfo.ExceptionFilters.Add(this as IExceptionFilter);
}
}

Bingo, it turns out that if you create a class to inherit FilterProvider and some IActionFilter, they will be automatically applied to your actions as ActionFilter already.

Note that Orchard is clever enough to help you to inject your dependencies using Autofac by constructor injection too.

Attribute in Orchard

Read on →